Good luck!!!
Wednesday, October 6, 2010
Blue with Chocolate Dot Bag Giveaway
The giveaway closes tonight! Don't forget to leave a comment on the giveaway post for your chance to win.
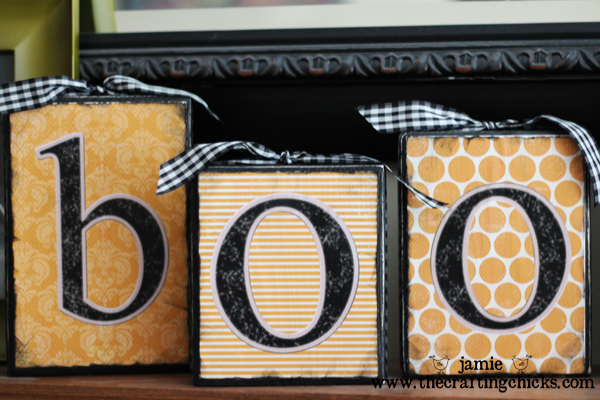
Boo Tutorial
Craftin Chicks has the cutest tutorial on some wooden Boo Blocks! My favorite thing about this project is you can easily use vinyl for the letters. Perfect!!!
Check it out here!
Tuesday, October 5, 2010
X-Ray Toy
I just had to post this. My husband is in the process of interviewing for Radiology Residencies. We will find out where we will be moving to in March. I can't wait. Anyhow, here is the cutest tutorial from SomeWhatSimple.
Enjoy!
X-Ray Child's Craft from Totally Tots
Enjoy!
X-Ray Child's Craft from Totally Tots
Monday, October 4, 2010
New Design - Welcome Monthly Images
Change the look of your front door as the seasons change with our welcome monthly add ons.
Check out our etsy shop to purchase.
Friday, October 1, 2010
Friday Giveaway - Blue with Chocolate Dot Bag
Look great while shopping. This eco-friendly shopping bag is 100% recyclable and reusable. It is very sturdy and holds up to 40 pounds more than 3 grocery sacks. Great for grocery shopping, day at the beach, and lots, lots more.
Wipes clean with a damp cloth. The dimensions are H 18” x W 14” x D 9”.
***Three ways to enter:
1. Become a follower of our blog and post a comment letting us know :)
2. Blog about this giveaway on your blog and leave us a comment letting us know.
3. Facebook or twitter about this giveaway and leave us a comment letting us know.
Contest will be open until Midnight MST on Wednesday, October 6th. Contest is open to US residents only!
*Please leave one comment per entry. Please leave a way for us to get ahold of you if you win!
*1 winner will be randomly selected (from random.org) and announced on this site on Thursday, October 7th. Please check back to see if you won, or leave your email with your comment. The winner will need to contact impressionsinvinyl@gmail.com to provide name and shipping address.
Thursday, September 30, 2010
Winner! Winner!
The winner of our 2 pumpkin faces is...
TheSharpTeethOfLove said...
New blog follower!
Congrats!
Please contact impressionsinvinyl@gmail.com and let me know the 2 pumpkin faces of your choice.
TheSharpTeethOfLove said...
New blog follower!
Congrats!
Please contact impressionsinvinyl@gmail.com and let me know the 2 pumpkin faces of your choice.
Wednesday, September 29, 2010
Wednesday Tutorial - Mummy Jar
This is a super cute and easy way to EAT giveaway Halloween treats! Gather your few supplies and lets get started.
Supplies:
Jar
Stencil (vinyl works great!)
Armour Etch Cream - can be found at local craft stores or online
Sponge brush
paper plate
candy
embellishments
optional:
scissors
squeegee

Trim stencil down to fit on glass jar. Attach and make sure that all the edges are pressed firmly down so cream doesn't spread.

Read directions on Etched Cream for all safety instructions. Apply a generous amount to the image on your jar. Allow at least 5 minutes to sit. Make sure that the cream doesn't touch any uncovered glass areas or surfaces.


After waiting rinse cream of jar under running water. The water neutralizes the acid. Make sure it is completely washed off.

Dry completely and peel off vinyl/stencil. Using a push pin can help remove small pieces.

Take a look and admire your beautiful etched design.
Supplies:
Jar
Stencil (vinyl works great!)
Armour Etch Cream - can be found at local craft stores or online
Sponge brush
paper plate
candy
embellishments
optional:
scissors
squeegee

Trim stencil down to fit on glass jar. Attach and make sure that all the edges are pressed firmly down so cream doesn't spread.

Read directions on Etched Cream for all safety instructions. Apply a generous amount to the image on your jar. Allow at least 5 minutes to sit. Make sure that the cream doesn't touch any uncovered glass areas or surfaces.


After waiting rinse cream of jar under running water. The water neutralizes the acid. Make sure it is completely washed off.

Dry completely and peel off vinyl/stencil. Using a push pin can help remove small pieces.

Take a look and admire your beautiful etched design.
Tuesday, September 28, 2010
Review - WoolenWondersbyEllen
I just recieved my package from Ellen and it is so beautiful.
Be sure to stop by her shop on etsy to see all the beautiful items she has to offer!
It came so quickly and is so beautiful. I can't wait to wear it. (I just have to wait for my sick baby to get better so it doesn't get dirty.)
Here are some of my favorite items from her shop.
Be sure to stop by her shop on etsy to see all the beautiful items she has to offer!
Monday, September 27, 2010
Monday - New Design
Add the beauty of a Fleur Di Lis to your home.
Measures 14" x 14".
To purchase check out our stores.
Friday, September 24, 2010
Friday Giveaway - Pumpkin Faces Closed
Want to make your pumpkin last through Thanksgiving? Can't stand the feel of pumpkin "guts"? Don't want to deal with a mess? If you answered yes to any of these questions then pumpkin faces are just for you!
Winner will choose 2 faces.
***Three ways to enter:
1. Become a follower of our blog and post a comment letting us know :)
2. Blog about this giveaway on your blog and leave us a comment letting us know.
3. Facebook or twitter about this giveaway and leave us a comment letting us know.
Contest will be open until Midnight MST on Wednesday, September 29nd. Contest is open to US residents only!
*Please leave one comment per entry. Please leave a way for us to get ahold of you if you win!
*1 winner will be randomly selected (from random.org) and announced on this site on Thursday, September 23rd. Please check back to see if you won, or leave your email with your comment. The winner will beed to contact impressionsinvinyl@gmail.com to provide name and shpping address.
Thursday, September 23, 2010
Winner! Winner!
The winner of our Two Owls decals is:
Stace said...
Okay, I am a follower and put it on my blog too! You are so talented Michelle! I love it!
Congrats!
Stace, please contact me so I can get colors and shipping address.
impressionsinvinyl@gmail.com
Stace said...
Okay, I am a follower and put it on my blog too! You are so talented Michelle! I love it!
Congrats!
Stace, please contact me so I can get colors and shipping address.
impressionsinvinyl@gmail.com
Wednesday, September 22, 2010
Pumpkin Frame Tutorial
Becky Higgings was a guest blogger over at eighten25 and shares a super easy tutorial to make a super cute frame!


Stop over at eighten25 to see the detailed instructions. You will enjoy the stop!
Monday, September 20, 2010
Hot Air Balloons
To purchase click here.
Sunday, September 19, 2010
Saturday Spotlight - CandleLynn on Etsy
Candle Lynn has super cute candles that smell wonderful. She is a pleasure to work with. I loved the custom order of pumpkin and leaf tarts that I bought. Stop by her shop and see what new scent will join your home!
Photos from CandleLynn
Saturday, September 18, 2010
Friday Giveaway - Two Owls Closed
Our Friday Giveaway today is our:
Color: Your Choice
Size: 14" owl and 10" owl
***Three ways to enter:
1. Become a follower of our blog and post a comment letting us know :)
2. Blog about this giveaway on your blog and leave us a comment letting us know.
3. Facebook or twitter about this giveaway and leave us a comment letting us know.
Contest will be open until Midnight MST on Wednesday, September 22nd. Contest is open to US residents only!
*1 winner will be randomly selected (from random.org) and announced on this site on Thursday, September 23rd. Please check back to see if you won, or leave your email with your comment. The winner will beed to contact impressionsinvinyl@gmail.com to provide name and shpping address.
Wednesday, September 15, 2010
Chiffon Skirt
I have two girls who would love this skirt. This is a great tutorial from Make it and Love it. This is now in my bucket list of things to make. I think I need to make my boy bucket list longer. It is currently empty while the girls has more things than I can count!
Tuesday, September 14, 2010
Monday, September 13, 2010
Giveaway
Jill over at The Virginia House is hosting a giveaway for a $10 gift certificate to my etsy store. Hop on over to her blog to look at her beautiful pictures.
Friday, September 10, 2010
2 Owls
So cute. This is one of our new designs. Perfect for any room with any color combination. Click here to purchase.
Thursday, September 9, 2010
Birch Tree
With fall right around the corner I realize how much I love trees and the leaves as they change colors. They are so beautiful. This thought inspired my latest design.
Birch Trees and birds.
Set includes 5 trees and 3 birds. Total size is 100" tall x 110" wide.
To purchase this decal click here!
Tuesday, June 15, 2010
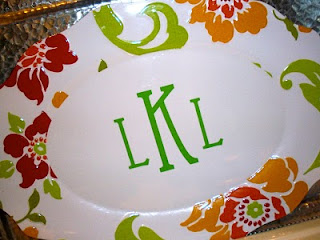
Monogramed Plate
Tuesday, January 26, 2010
Application Instructions

Step 1. Clean the Surface
Wipe the surface clean with water or a cleaner that will not harm the surface or affect adhesive backing of vinyl. Dry the surface with a lint-free cloth.

Step 2. Apply Painters Tape
Apply painters tape to top of Impression.

Step 3. Tape Impression to Wall
Tape your Impression to the wall exactly as you want the finished look. Make sure that it is level!

Step 4. Cut in Sections
If your Impression is big, you may cut it to finish in sections. Make sure that it is taped to the wall good so it doesn't come separated from the other sections. Make sure not to cut Impression.

Step 5. Flip and Peel off Backing
Using the tape to act as a hinge, flip the Impression up and peel off backing. Make sure that the vinyl sticks to the application tape. If it does not stick, replace application tape and rub until it sticks to the tape.

Step 6. Flip Back Over and Rub Vinyl Onto Wall
Carefully flip vinyl back over and rub onto surface with hands. Make sure to pull straight down to eliminate "bubbles". Once vinyl is on surface, rub with application tool to make it stick to surface. (Note: Once vinyl has touched surface or itself, it is very hard to move.)

Step 7. Peel Application Tape Away From Wall
Carefully peel away application tape from surface of Impression. If Impression doesn't stick to wall completely, replace application tape and rub again. Go slow to insure a good stick.

Step 8. Enjoy!
Sit back and enjoy your new Impression!
Removal Instructions
Gently heat Impression with blow dryer and carefully peel vinyl off of surface.
Impressions in Vinyl does not assume responsibility for any damage to surface due to vinyl.
Website Under Construction
I am currently in the process of switching host and adding a shopping cart to my website. Please be patient while we undergo this change. For now, if you have questions, please contact me at
impressionsinvinyl@gmail.com
impressionsinvinyl@gmail.com
Subscribe to:
Comments (Atom)


